For the fingerboard, we used a pre-slotted, pre-radiused fretboard. This makes the job a lot easier and saves plenty of time. This fingerboard came ready for 24 frets so we will need to remove the extra fingerboard length for this guitar. Cut the fretboard at the 23rd slot and sand to the final length. Make sure you account for your binding thickness.
 We are next going to taper the fingerboard. Sorry I forgot to take picture of these steps. I will try my best to explain the procedure. First I marked the center of the fingerboard and then proceeded to mark the 43mm width at the nut and 58mm width at the body end. Make sure you again account for the binding thickness. On a table saw, we cut a scrape board (used a piece of mdf) to about 12″ wide. After cutting the board do no move the table saw fence. Using double side tape, tape the fingerboard to the scrape board lining up the 43mm and 58mm marks. After running the fingerboard through the table saw you will have one side of the fingerboard tapered. Repeat this process on the other side.
 For the next step I like to use painters tape protect the wood and mark where the inlay marks will go. After taping the position of the inlays you should double check inlay position against a guitar. Many guitar builders have accidentally put inlays on the incorrect fret position.
 Lay each inlay into position and trace the inlay with a x-acto knife.
 Remove the inlays and go over the trace with the knife again to deepen mark. This will help the fingerboard from chipping when you’re routing the inlay pockets.
 To route the inlay pocket I used a dremel with a router base and small endmill. This dremel router isn’t the best and requires a lot work to keep centered. We would recommend an upgraded to the dremel router base. The fingerboard was installed on a piece of MDF and clamped into place with acrylic plastic strips. The acrylic strips acted as a straight edge for the router base to run against. With some patients everything came out ok.


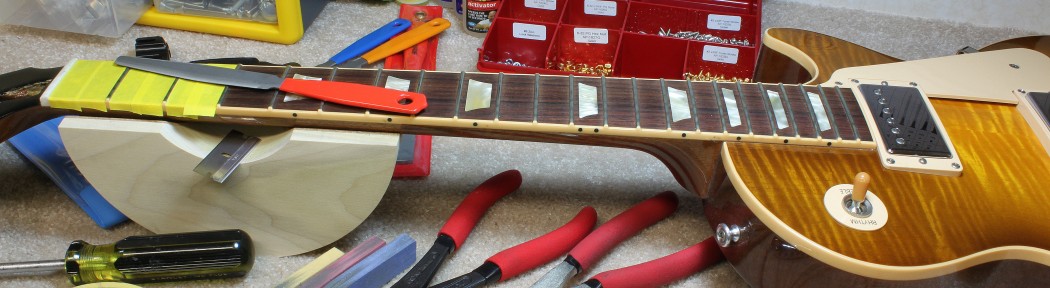
 Here is a close-up picture of the fingerboard with the inlays installed. Any gaps will be filled will be filled with Testors plastic cement and fine rosewood sanding dust.
 We will continue working on the fingerboard in the next blog entry which will include gluing in the inlays, fretting and binding the fingerboard.


Recent Comments